Yes, you read that right Boxelder Syrup. The Boxelder tree has always been considered a "junk" tree in my book. They grow like weeds, have weak wood, and in general are just undesireable to have around. However, I have grown to appreciate them since we started learning how to make maple syrup. A little known fact is that the Boxelder tree is part of the maple family, and can be tapped in the same way for making syrup. Since we have no maple trees on our property (except for those I've planted for my grandchildren) this was welcome news for us. We've found the taste to be a little different, but still very good, and very sweet.
Since we moved out to the farm, most years we have tapped our Boxelder trees and made syrup. Last year in particular, we were very ambitious and made about seven gallons of syrup. For those of you unfamiliar with the process, that means collecting and boiling down over 280 gallons of sap. Approximately 40 gallons of sap produces one gallon of syrup.
This year we are planning to expand the operation, and see if we can produce some extra syrup to sell to our customers: so the preparation has begun.
A couple of weeks ago, we cut down a number of dead elm trees and ended up with about a cord of firewood to run the boiler. This was took most of a Saturday, to get it hauled to the house and stacked up where we boil the sap.
This year I decided to upgrade our operation, so I bought 100 used taps off of e-bay. However, in past years we have used homemade wooden taps. These are easy to make, but can be time consuming if you want to tap a lot of trees. We make them out of sumac branches. (You have to be careful to use the red-berried type, not poison sumac.) Find some straight branches off a live bush that are about one inch in diameter and cut pieces about 5 inches long. Drill out the soft center with a 1/4 inch spade bit. Then whittle one end down to a half inch in diameter, making sure to have a nice gentle taper.
To tap our trees this year, I got a bit more high-tech too, in that I hauled our generator around in back of our ATV trailer, and used a corded drill (translated: more power) to drill tap holes the trees, instead of a wimpy cordless. (I'm not so old-fashioned that I use a bit-and-brace.) We did this last Thursday, thinking that the warm weather would be the begin of the sap run, but alas we went back into the icebox on Saturday.
So, we are waiting for the warm weather....
Thursday, March 12, 2009

Saturday, March 7, 2009
Trimming Hooves
So when was the last time you trimmed you fingernails? Are they getting a bit long? Did you know that goat and sheep hooves grow, just like your finger and toe nails? Well they do. With our sheep we have always trimmed their hooves annually, after they are sheared in early spring. However, with goats they grow quite a bit faster, so when I looked at their feet the other day it was quite a surprise!
So, off to the cabinet I went for the hoof trimmer. With our fancy new milking stand, we have the perfect place to trim our goats hooves, and they get a little snack at the same time. Trimming sheep and goat hooves is pretty easy (says the farm boy), you just trim the hard outer wall of the hoof down until it is flush with the "frog", which is the soft center part of the hoof. The heel of the hoof sometimes needs to get trimmed back a little bit as well to be level with the walls of the hoof. Sometimes there is a little excess growth between their "toes" as well that needs some trimming.
In no time our goats were as nimble as ever on their freshly trimmed hooves!
Wednesday, March 4, 2009
Baking Bread
There is nothing like the smell of bread baking in the oven, and it is hard to beat the taste of a warm slice of freshly baked bread smothered with melted butter! Thanks to my hungry growing boys, I've had a lot of practice at making bread. In this post I'll share with you how I make my yeast bread. Later, I'll post on my favorite bread to make-sourdough!


 Here you can see that the dough is no longer sticking to the sides of the bowl.
 After the kneading, I divide my dough into five portions. I weigh each one (a habit I started do to wanting my loaves exactly the same size for market).
 Then I shape my loaves, put them in my bread pans, and set them in a warm place until they are about doubled in size.

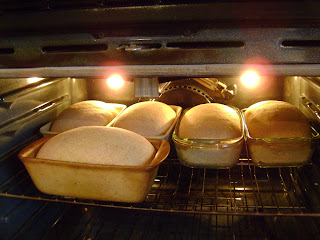
 At this point, the entire house is filled with the aroma of fresh baked bread, and all the vultures, I mean children, come running into the kitchen declaring how hungry they are! :>}
The first step in baking bread is grinding the wheat berries. The reason I grind my own wheat is because grains quickly go rancid after grinding, and you get more nutrition from freshly ground flour. Freezing your flour will help maintain it's freshness too. There are many different varieties of wheat berries. Hard wheat, as opposed to soft, is the wheat of choice when baking bread. Currently I am using a combination of hard red and hard white. I think most people prefer bread made with hard white wheat. I just happened to come across some hard red wheat berries at an unbeatable price!
Once I have put my wheat berries through my grain mill and have my freshly ground flour, I start adding the ingredients to my Bosch bowl. For those of you who are not familiar with a Bosch, it is a wonderful machine that simplifies all sorts of tedious kitchen jobs. Named after a German inventor, Robert Bosch, this machine has all the quality and performance you'd expect from something made in Germany. With it you can knead enough dough to make up to six loaves of bread. You can also get all kinds of accessories for it: a blender, slicer shredder, and food processor-just to name a few!
In my Bosch bowl I put my warm water, salt, olive oil, honey, and flour. I mix these together and then add my yeast. At this point, I leave my Bosch running while I add one cup of flour at a time until the dough clears the sides of the bowl. Then I let the Bosch knead the dough for about ten minutes. (Of course, this could be done by hand too.)
Here you can see that the dough is no longer sticking to the sides of the bowl.After the kneading, I divide my dough into five portions. I weigh each one (a habit I started do to wanting my loaves exactly the same size for market).Then I shape my loaves, put them in my bread pans, and set them in a warm place until they are about doubled in size.In this picture you see my dough ready for the oven. It will bake for 30-35 minutes.
Voila! Homemade bread!
At this point, the entire house is filled with the aroma of fresh baked bread, and all the vultures, I mean children, come running into the kitchen declaring how hungry they are! :>} Send me an email if you would like my bread recipe in detail.
Monday, March 2, 2009
"Valentine" by Emily
One day last summer, Mom and Jonny were in the herb garden, when Mom spotted a large green caterpillar in the parsley. Jonny brought it to me, (Emily) and I put it into a large jar that had sticks, grass, and leaves in it, as well as several other caterpillars. To our joy, one day, the green caterpillar was gone, and there was a cocoon hanging on a twig. We were thrilled! None of the other caterpillars in the jar ever made cocoons. Time passed. Soon everybody forgot about the big jar with the cocoon in it. The leaves and grass rotted away, and whenever someone mentioned cleaning out the jar, one of us would pipe up, "no! the cocoon is in it!" while someone else would reply, "it'll never hatch." But the cocoon continued to hang, undisturbed. ...winter came, and the cocoon was forgotten.....forever...
Until February 13th, the day before Valentine's Day. I was in the school room with Ben and Jonny, teaching them school. (Mom was gone shopping in town with Dad, so I was the substitute teacher) While deep in Algebra, (just kidding!) Ben suddenly yelled, "LOOK!!! OUR BUTTERFLY!!!!!!!!" Shocked, we looked up at the long-forgotten jar, and to our joy, there calmly sitting on a twig, was a beautiful black swallowtail butterfly.

For at least the next twenty minutes, Arithmetic was forgotten as we "oood" and "ahhhd" over our butterfly, snapped lots of pictures, and called Mom and Dad to exclaim the exciting news. We argued over a name for her for quite a while, as we searched through the name book, but couldn't decide on anything. Eventually, we finally got back to school, and Mom and Dad returned. When Dad mentioned something about "alcohol" we were horrified. "What!?!? Our butterfly!? But she's our butterfly!!!" Undoubtedly, our butterfly would have had this untimely fate, if it were not for a wonderful person who rescued her. =) The next day was Valentine's Day. We had Aunt Janell, Uncle Jay, and Grandma and Grandpa Housman over for a Valentine's Dinner. Of course, we couldn't wait to show them our butterfly, and Dad and Grandpa both agreed that she was going to die...but not Grandma! It was Grandma to the rescue! A day or so later, we received an email with a lot of information about feeding butterflies! So, our butterfly, whom we finally decided to name "Valentine" was rescued....thanks, Grandma!!!



Until February 13th, the day before Valentine's Day. I was in the school room with Ben and Jonny, teaching them school. (Mom was gone shopping in town with Dad, so I was the substitute teacher)
 While deep in Algebra, (just kidding!) Ben suddenly yelled, "LOOK!!! OUR BUTTERFLY!!!!!!!!" Shocked, we looked up at the long-forgotten jar, and to our joy, there calmly sitting on a twig, was a beautiful black swallowtail butterfly.

For at least the next twenty minutes, Arithmetic was forgotten as we "oood" and "ahhhd" over our butterfly, snapped lots of pictures, and called Mom and Dad to exclaim the exciting news. We argued over a name for her for quite a while, as we searched through the name book, but couldn't decide on anything. Eventually, we finally got back to school, and Mom and Dad returned. When Dad mentioned something about "alcohol" we were horrified. "What!?!? Our butterfly!? But she's our butterfly!!!" Undoubtedly, our butterfly would have had this untimely fate, if it were not for a wonderful person who rescued her. =) The next day was Valentine's Day. We had Aunt Janell, Uncle Jay, and Grandma and Grandpa Housman over for a Valentine's Dinner. Of course, we couldn't wait to show them our butterfly, and Dad and Grandpa both agreed that she was going to die...but not Grandma! It was Grandma to the rescue! A day or so later, we received an email with a lot of information about feeding butterflies! So, our butterfly, whom we finally decided to name "Valentine" was rescued....thanks, Grandma!!!


About Valentine:
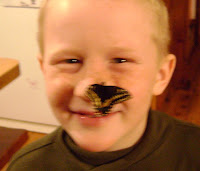
Valentine Joy Housman (full name) is so much fun! An extremely beautiful butterfly, she is black, with yellow spots, orange spots, blue spots, and purple spots. Valentine lives a happy life in our bay window, surrounded by Mom's potted plants. In the spring, we will let her go. Tonight, Jonny, who was "playing" with her, started shrieking as she climbed up his face and perched contentedly on his nose! It was really hilarious, as you can see in the pictures below!


Feeding Valentine:
Grandma sent us plenty of very helpful information about feeding our butterfly. Just in case any of you may ever "hatch" a butterfly, here's three tried-and-true ways:
The first way is lots of fun. Finger feeding. Make up a solution of 1:20 sugar to water. Next, dip your finger in the sugar water. Leave a drop on your finger and move it close to the butterfly's mouth. Usually it will stick out it's tongue and have a drink!
The first way is lots of fun. Finger feeding. Make up a solution of 1:20 sugar to water. Next, dip your finger in the sugar water. Leave a drop on your finger and move it close to the butterfly's mouth. Usually it will stick out it's tongue and have a drink!
The second way is to use a cotton ball. Take a cotton ball, dip it into the sugar water, and place it on/in a small plate or container. Place the butterfly on it, and viola!
The third way is actually one that Mom thought of herself. Take an orange, cut it in half, and place the butterfly on it. Just this morning, when I peeked at her, she was sitting on the orange with her long tongue stuck in the orange.

About the Swallowtail Butterfly:
Swallowtails lay their eggs on Queen Anne's Lace, parsley, celery, and carrots. The caterpillars are bright green with black bands and yellow or orange spots. Uniquely, it has "tails" on it's hind wings, and it ranges throughout North America from Southern Canada into Mexico. The male swallowtail may guard it's territory by sailing around its boundaries for long periods. The next fact I learned from Grandma Housman, and it is: butterflies have tiny feathers on their wings, thus we have to be careful when we touch Valentine, so as not to brush any off, making her unable to fly.
If you have any questions or would like to leave a note or anything, please leave a comment! We'd love to hear from you!
Friday, February 27, 2009
The Chicks Have Arrived! by, Emily
 Last Friday, Dad ordered 25 Gold star laying hens, and two roosters. Yesterday, (Thursday) we woke up to Dad saying, "Time to get up! The post office just called and said our chicks are in!" 'What a great way to start my day!' I thought as I made my bed. After chores, me, Dad, Ben, and Jonny all jumped into the truck, turned the heat on high, and zoomed off to the post office to pick up the day-old chicks.

Of course, the ride to the post office seemed to take much longer than usual! When we finally arrived, me and Jonny hopped out, and ran to the door, rang the bell, and waited. About 30 seconds later, the door opened, and the postman handed us a box with loud peeps coming from it! Our chicks! We got into the now-very-warm truck, and began the ride home.
 Excitedly, we opened the box and petted and played with the chicks on the way home. It isn't often you get to play with baby chicks in the truck! :) They were all very healthy, and peeping so loud it hurt my ears! When we arrived home, Dad ran into the house, and filled up the chick's waterer with luke-warm water, then brought it back and drove out to the chicken coop in the truck. (It was too cold to carry the box out).
 Upon arriving, we took the box of peeping fluff-balls into the coop, and put them one-by-one into the pen, dipping their beaks in the water, a process which we do every time, so they know where the water is. When they were all in the pen, they huddled together in a small bunch, directly under the heat lamp. Because they continued to do this, we hung up another heat lamp, and then, since they showed no progress of warming up, put a small heater in their pen. Not long after, they were running around, warm, happy and peeping. In a few hours, Dad went out to check on them, and gave them a small feeder filled with starter feed. Right before chicks hatch, they "eat" the yolk inside of the egg, enabling them to be without food for the next day or so, thus they can be shipped through the mail, and they don't have to be given food right away. The chicks are very happy in their new home, and as cute as could be! :)
Monday, February 23, 2009
Building the Milking Stand
Today we had another carpentry class for the boys. Unfortunately Ben had a dentist appointment so he missed out on most of it. The task today was to build a milking stand for our goats. For those of you that have never milked a goat (I am still part of that group for another three weeks), a "milking stand" is a platform that the goat stands on for milking. A goat being much shorter than a cow would require a person to almost stand on their head to milk it. The milking stand also has a built in stanchion - a device that goes around the goats neck to keep it from moving around too much. This component is also called a "head gate".
With Emily running the camera, taking video and photos, Jonny and I built this together in about three hours. Of course it would have been quite a bit quicker, but trying to direct a video shoot while helping a young man develop his carpentry skills slowed things down considerably. (By the way, if anyone likes to edit video, I have some footage I need to compile. I thought it would be fun to post on YouTube.)
The plans for this milking stand were downloaded from http://www.fiascofarms.com/.
Sunday, February 22, 2009
To Prune a Fruit Tree
Well, it is that time of year again. Every February I clean and sharpen the pruning shears and go to work on the trees in our orchard. While I wouldn't consider myself an expert, I've done a lot of reading on the subject over the years, and have become fairly proficient at giving our trees their annual trim job.
There are several reasons to prune: to keep the trees healthy, to control size, and to improve quantity and quality of the fruit. There are lots of techniques and tips for doing the job, my favorite book on the subject is "The Pruning Book" by Lee Reich. Every year I check it out from the library to refresh my mind on what I'm doing, and to learn about how to prune whatever new things I planted the year before.
When it comes to planting trees, my wife will attest that I am somewhat of a fanatic. Every year we've lived on our farm I've planted at least one tree, but often times many more. We started our orchard the second year on the farm. We have twenty-three apple trees, four pear, three apricot, three plum, two cherry, and two peach. The plum, cherry, and peach are new additions in the last couple of years. All the other tree plantings have been ornamental trees, shade trees, and windbreaks. And of course all of these trees need to be pruned!

 So yesterday I spent most of the day in our orchard heading-back and thinning out the branches on our fruit trees. Muttering about the rebellious ways that these trees like to grow, anguishing over which branches to take out, and dreaming of large luscious fruit next summer (ok, I am exaggerating a bit on that last point) made for a mentally and physically exhausting day. As you can see by the trailer full of branches, there were lots and lots of branches that met their demise, my hand was aching by the end of it all. Now, all I have left is the another 100 or so of the other trees to prune this week.

All these labors have paid off though. Two years ago we had a nice crop of apricots, last year we got our first pear and had a bumper crop of apples (the picture shows just a portion of the harvest). We look forward to many more years of eating fruit fresh from the tree, the most delicious way on earth.
Subscribe to:
Posts (Atom)